 By
By Interior layout tools aren’t great. In general, you’re picking between either:
- Easy and beautiful, but inflexible (~4 hours to finish)
- Flexible and powerful, but fiddly and tedious (~40 hours to finish)
You’re stuck with either one or the other of those compromises.
It is possible to compensate for some of the first category’s limitations by combining multiple tools and modifying/combining the output PDFs (for example you might use one tool for the core contents and another for front- and end-matter, or you might go in and manually correct faulty numbering in the finished PDF). Sejda is the best tool I’ve found for these sorts of PDF manipulations.
If your book is mostly text (i.e., no reliance on footnotes, tables, a glossary, or fancy layout), then you’ll find this step to be trivially easy.
Easy and beautiful, but inflexible
1 // Vellum wins first prize here. It’s beautiful, easy, and just works. However, it’s $249, Mac-only, and has lacklustre support for footnotes, tables, and anything fancy. But if that works for you, it’s worth it.
I used Vellum for several versions of The Mom Test, and I loved it. I stopped using it for the seemingly mundane reason that it pushes all footnotes to the end, and I like them to be at the bottom of the page. But again, if their constraints work for you, you’ll likely be very happy with Vellum.
2 // Atticus is a new entrant, made by the team behind Kindlepreneur (best advice about kindle ads) and PublisherRocket (keyword research for Amazon). It’s aiming to be a combination of Scrivener (a writing environment) and Vellum (easy export and beautiful-by-default layout). It’s slightly cheaper than Vellum, and is being more actively worked on. Again, it’s quite constrained/opinionated with what it can do, but if that’s what you need, then it’s a great choice.
3 // For very simple layouts, Reedsy’s Online Book Editor is a surprisingly credible option. It’s essentially the same as Vellum, but free and web-based.
Reedsy’s main business is in providing a vetted marketplace of freelance book professionals (editors, designers, etc), so they’re trying to get you onto the platform, which is why this tool is free.
Like Vellum, there’s essentially zero ability to customize the output, and you can get tripped up by seemingly trivial problems (for my latest book, it was the fact that I had included an Interlude that messed up the Chapter numbering). But if their defaults work for you, then this is a brilliant option.
Ultimate layout control
1 // For design-heavy books (by which I mean that every page requires custom layout and typography), then Adobe InDesign is the industry standard, with a convenient set of prose-friendly options like flexible text-flows across multiple layout boxes.
2 // Alternatively, many authors swear by Affinity Publisher, another layout-heavy powerhouse.
This is an extremely big task if you’re learning from scratch (hundreds of hours), so unless it’s something you particularly enjoy, you may want to explore hiring a freelancer rather than trying to DIY.
But most nonfiction doesn’t require quite so much manual layout, and you can use either MS Word or Google Docs.
Doing it from scratch with MS Word or Google Docs
If you’re using Word, you’ll want to start with a book template.
If you’re using Google Docs, you’ll need to install some add-ons and use some extra tools for post-processing the output PDF.
The “hard parts” of using either GDocs or Word are:
-
You get to (or have to) pick your own font, line height, typography, and everything. For print, I use:
- Body text: Merriweather Light, 9px, 1.4 line height, justified
- Heading 1 (chapter titles): Merriweather Bold, 21px, 1.05 line height, 96px spacing before, 48px spacing after, centered
- Heading 2 (section titles): Merriweather Normal, 12px, 1.3 line height, 16px before, 8px after, left aligned
- Heading 3 (sub-section titles): Merriweather Normal, 11px, 1.3 line height, 16px before, 12px after, left aligned
- Block quotes: Merriweather Light, Italics, 9px, 1.3 line height, 12px before, 12px after, justified
- Headers & footnotes: Merriweather Light, 8px, footnotes left aligned
-
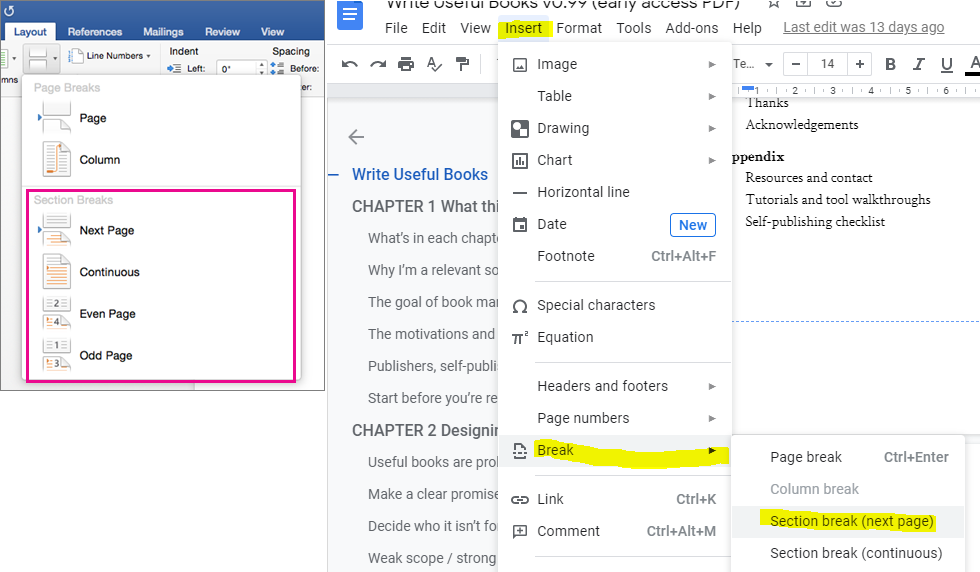
Right-hand (odd page) headers normally contain the chapter title, which requires using the largely hidden “section breaks” feature (which allows each section’s header to be customized)
- Chapters always begin on an odd page, which can mean inserting blank pages (without headers, so again a new section)
- Headers are hidden from the first page each chapter
- You need to define the page size, margins, gutter, etc
- See your book printer for a list of acceptable page sizes
- Note that the posted margins are a minimum, not a suggestion.
- I use 8.5”x5.5” page size with 1.5cm margins on the top and bottom, 1.3cm on the outside edge, and 1.9cm on the inside edge (i.e. the gutter)
- Print margins alternate to be slightly thicker on the inside edge, to allow for the page fold where the book is bound (i.e., the gutter)
- On KDP, the gutter should be at least an extra .125” for <150 pages or .25” if >150 pages
- This is trivial on MSWord (it’s just a setting), but is a impossible to do natively on GDocs, which means that you’ll need to post-process the PDF
- After adding a table of contents, you’ll often need to adjust it, which can sometimes cause it to take one extra/fewer pages, which messes up everything. I solve this by using the page numbering option to begin page numbering on the section that contains the first chapter
- You’ll also need to ensure that all front-matter has an even number of pages (add a blank page if necessary), so that the first page of the first chapter begins on a right-hand-side page.
- Lastly, and most irritatingly, is the search for weird page breaks, where a single line of a paragraph/list/quote gets isolated on its own page (or where a section title begins right at the end of a page).
- You can brute force this by using page breaks, but where possible it’s better to use the formatting options “Keep lines together,” “Prevent single lines”, and “Keep with next.” (In GDocs, these options are hidden in Format→Line Spacing).
Okay, so that’s the basics. There are also a few quirks unique to GDocs:
- GDocs won’t let you use custom page sizes (it only has a selection of pre-set options). Solve this by going to Add-Ons→Get Add-ons→Page Sizer (by Nat Burns). It works well. (Although you want to set your margins first, since setting margins tends to reset page size.)
- The gutter is not natively supported on GDocs, which makes it a pain. My solution is:
- Export the whole document as a PDF two times
- Once with 1.3cm on the left and 1.9cm on the right (or your preferred margin size) — these will become your left-hand (even) pages
- And then export again with 1.9cm on the left and 1.3cm on the right — these will become your right-hand (odd) pages
- I then use Sejda to delete the odd pages from the first export and the even pages from the second
- And finally use Sejda again to merge alternating pages of those two half-documents into a single whole.
- Warning: It looks like you can accomplish this more easily by using Sejda’s ‘crop’ and/or ‘resize’ options, but KDP won’t recognize the modifications to the page size (PDF is a complex format and actually has four different ways to define page size – Ingram can handle Sejda’s approach, but KDP can’t)
- Export the whole document as a PDF two times
So… there you have it :). If you can go with an easy option like Vellum or Reedsy, then do that. If you need absolute layout control, use InDesign. And otherwise, you’ll get the fun of figuring out MS Word or GDocs. (Or hire a freelancer.)